Table of Contents
ToggleA cluttered kitchen cabinet isn’t just annoying, it wastes time and space. You reach for the pasta and knock over three containers. You need a measuring cup and can’t find it. Sound familiar? Good news: organizing your kitchen cabinets doesn’t require a complete renovation or a professional organizer’s budget. With the right strategies and a few inexpensive tools, you can transform your cabinets into functional, easy-to-navigate storage that actually works. Whether you’re dealing with deep cabinets that swallow pots whole or narrow shelves that are hard to access, these seven game-changing ideas will help you reclaim control of your kitchen storage. Let’s dig in.
Key Takeaways
- Kitchen cabinets organization ideas should begin with a thorough assessment of your current setup, grouping items by category and removing unused duplicates to free up 15–25% of space without spending money.
- Install vertical dividers, tension rods, and shelf organizers to prevent items from sliding and create distinct zones that maximize storage height and visibility.
- Use clear containers with labels to keep pantry items visible, prevent duplicate purchases, and maintain a cohesive system that works long-term for shared household duties.
- Optimize deep cabinets with affordable pull-out organizers or DIY sliding shelf solutions to make back-of-cabinet items accessible without unloading entire shelves.
- Organize by category and frequency of use—keeping daily-use items at eye level and grouping related items together near their point of use reduces wasted steps and maintains system longevity.
- Apply the ‘rule of three’ for multiples (one everyday set, one backup, one special-occasion) to eliminate hoarding and keep cabinets functional and clutter-free.
Assess Your Current Cabinet Setup and Storage Needs
Before you buy a single organizer, take time to understand what you’re working with. Open every cabinet door and really look at what’s inside. Are shelves adjustable or fixed? How much depth do you have? What’s actually in there, and more importantly, what do you use regularly versus what’s just taking up space?
This assessment step is critical. Pull everything out and group items by category: cooking equipment (pots, pans, lids), dishes, glasses, food containers, appliances, and so on. As you sort, ask yourself honest questions: Do you use that bread maker? Are you keeping duplicate measuring cups? This natural editing process often frees up 15–25% of your cabinet space without spending a dime.
Measure your cabinet width, depth, and shelf heights. Note which shelves are easier to reach (eye level and waist level) and which are awkward, higher shelves and deep corners typically become dead zones where items disappear. This mapping helps you place your most-used items in prime real estate. Items you grab daily belong in easy-access spots: occasional-use pieces can live higher or deeper.
Understanding your kitchen’s workflow also matters. If you cook frequently, items should be grouped by cooking station: pots and lids near the stove, glasses and dishes near the dishwasher or sink. This layout reduces wasted motion and makes cleanup faster. Take photos of your cabinet interiors before you start, you’ll be amazed at the transformation, and it’s helpful if you want to tackle other spaces in your home later.
Install Vertical Dividers and Shelf Organizers
Vertical dividers are workhorses in cabinet organization. A simple shelf divider, whether a tension rod, a wire shelf divider, or a custom wooden insert, prevents plates from sliding and creates distinct zones within a single shelf. This is especially useful for baking sheets, cutting boards, and serving platters that otherwise slouch and take up twice as much space.
You have several options. Tension rods are adjustable and cost $5–$15: they work great for upright plates and thin items. Expandable shelf dividers ($10–$25) sit on the shelf and create multiple compartments. For a more permanent solution, you can install shelf supports or pegs to create a secondary shelf layer, effectively doubling your storage height.
Consider a pull-out shelf insert or sliding shelf riser for cabinets you don’t access often. These let you see and reach items in the back without performing acrobatic arm stretches. Some models cost under $30 and install without tools.
When installing anything, make sure it doesn’t block door hinges or interfere with the cabinet frame. Measure twice before drilling or securing anything permanently. If your cabinets are rental or you’re avoiding damage, adhesive-based organizers and tension rods are your friends, they work nearly as well and leave no holes behind.
Grouping similar heights together (all your plates stacked upright, all your glasses clustered) not only looks neater but prevents that domino effect when you remove one item. Vertical organization saves space, makes items visible, and keeps cabinets from becoming a Jenga game every time you’re hungry.
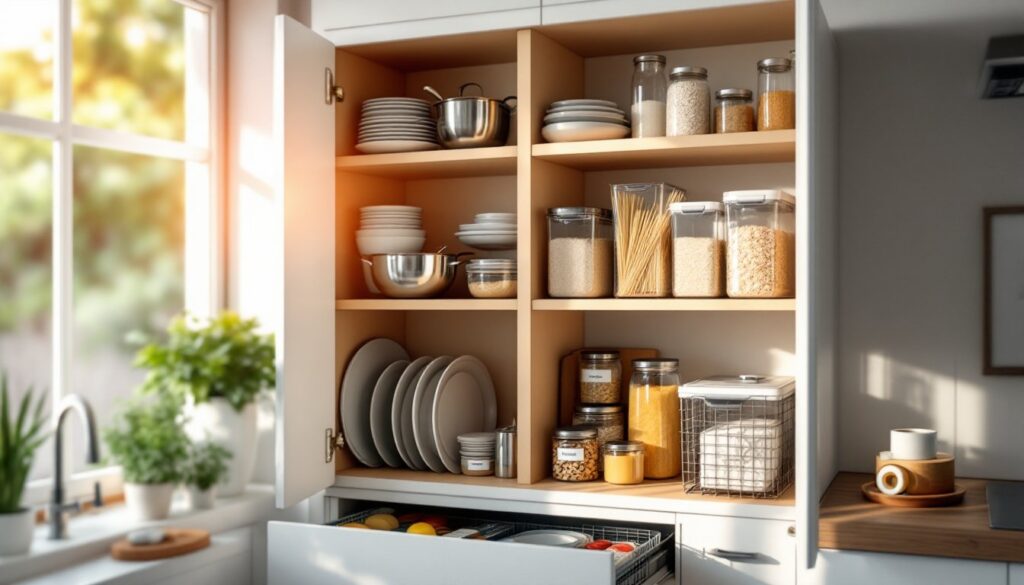
Use Clear Containers and Labeling Systems
Once you’ve sorted and eliminated clutter, invest in clear storage containers. You can’t organize what you can’t see, and opaque boxes hidden in the back of the cabinet are guaranteed to be forgotten, and probably replaced with duplicates. Clear plastic or glass containers let you know at a glance what’s inside and when you’re running low.
Pick a container size and shape that matches your most common items. Shallow rectangular bins work well for lids and food wraps: taller containers suit pasta boxes or cereal: small square containers are perfect for spices, tea, or small packets. Brands like OXO, Rubbermaid, and store-brand versions all work fine, the key is choosing a consistent system so containers nest efficiently and look cohesive.
Labeling is non-negotiable if you share kitchen duties with others. A simple label maker ($15–$30) or even adhesive labels and a permanent marker do the job. Write the item name and, when relevant, the expiration date or reorder threshold. Labels take 30 seconds per container and save arguments about what’s what.
Clear containers also protect food from pantry pests and keep dry goods fresher longer than opened boxes. A $2 label maker tape and a few containers ($20–$40 for a starter set) transform the look and function of cabinets instantly. According to resources like Martha Stewart’s guide to kitchen cabinet organization ideas, consistency in container shapes and labeling systems is key to a space that stays organized long-term.
Optimize Deep Cabinet Spaces With Pull-Out Solutions
Deep cabinets are storage killers. You put something at the back and it vanishes until you move everything out. The fix? Pull-out organizers.
Sliding Drawers and Baskets
Sliding drawer inserts and baskets are game-changers for deep under-sink cabinets, lower cabinets, and pantry spaces. These pull-out organizers let you access items at the back without unloading the whole shelf. You can find them at most hardware stores or online: sliding wire baskets ($15–$30), wooden pull-out drawers ($30–$80), or even DIY solutions using old dresser drawers and under-cabinet shelf rails.
Measure your cabinet depth and width carefully. Standard under-sink cabinets are typically 15 inches deep and 30–36 inches wide, but verify your measurements before buying. Most quality pull-out organizers come with installation hardware and fit standard cabinet frames, though some may require shims if your cabinet floor isn’t perfectly level.
For a budget approach, use inexpensive plastic bins on a sliding shelf board. A piece of plywood cut to size (12–18 inches wide by 14 inches deep), fitted with drawer slides, costs under $40 in materials and takes an hour to assemble. This DIY approach gives you a custom fit at half the store-bought price.
Place frequently used items (cleaning supplies, pot lids, food storage containers) on the pull-out shelf, and less-used backup stock further back. This layout cuts reach-time and makes your cabinets feel twice as accessible. Pull-out solutions pair especially well with inexpensive home organization ideas since they’re often affordable and deliver big functionality gains.
Organize By Category and Frequency of Use
The best cabinet system in the world falls apart if items aren’t grouped logically. Organize by category first, then by frequency of use within that category.
Start with broad categories: cookware (pots, pans, lids), serveware (bowls, platters), drinkware (glasses, mugs, cups), dry goods (pasta, rice, baking supplies), and appliances. Within each category, place daily-use items in the most accessible spots. Your everyday dinner plates go on eye-level shelves: your good china lives higher or in a less-trafficked cabinet.
Zone your cabinet layout around your kitchen’s workflow. Keep cooking gear near the stove, dishes and glasses near the dishwasher or sink, and snacks and breakfast items together in one cabinet. This reduces wasted steps and makes cooking and cleanup more efficient. When family members know where things live, they actually return items to the right spot, a psychological win that keeps your system from degrading over time.
Use the “rule of three” for items you own multiples of. One everyday set of dishes, one backup set, one special-occasion set. Three measuring-cup sets maximum. If you’re keeping multiples of things you rarely use, you’re just hoarding space. Ruthless editing here pays dividends.
Don’t underestimate the power of vertical stacking within categories. Stack plates with a divider between them, nest bowls by size, cluster glasses by type. Vertical stacking can double the number of items you fit on a single shelf. Use hooks on the inside of cabinet doors for frequently grabbed lightweight items like measuring spoons or apron ties, they’re visible and accessible, and they free up valuable shelf real estate. Resources like Real Simple’s guide to organizing kitchen cabinets emphasize this category-first approach as foundational to long-lasting organization systems.
Conclusion
Kitchen cabinet organization doesn’t have to be overwhelming or expensive. Start with an honest assessment of what you have and what you actually use. Use vertical dividers, clear containers, and labeling to create a system that works for your household. Pull-out organizers tackle deep-cabinet woes, and logical categorization keeps everything intuitive. The goal isn’t perfection, it’s a functional system that saves you time and frustration every time you open a door. With these strategies in place, your cabinets will stay organized for months to come.