Table of Contents
ToggleA square paver patio offers versatility, durability, and clean lines that work with nearly any home style. Whether you’re starting from bare ground or replacing an aging concrete slab, square pavers deliver straight edges and consistent dimensions that make layout predictable and installation manageable for DIYers. The range of available patterns, colors, and material combinations means you can build anything from a subtle, monochromatic retreat to a bold statement that anchors your entire backyard. This guide walks you through seven modern square paver patio designs, plus the installation and maintenance know-how to make your project succeed without hiring a crew.
Key Takeaways
- Square paver patio designs offer versatility and clean lines that work with nearly any home style, from monochromatic retreats to bold statements anchoring your backyard.
- Grid, herringbone, and diagonal patterns provide different aesthetic impacts—grids are easiest for DIYers, while diagonal patterns visually stretch modest patios but require more cuts and careful base preparation.
- Proper base preparation with 4 inches of compacted crushed stone is crucial for preventing settling and ensuring long-term stability of your square paver patio.
- Color blocking and mixed material combinations create custom looks affordably, such as pairing concrete squares with smaller accent pavers or contrasting stone types strategically around grilling and seating areas.
- Small patios benefit from rectangular pavers oriented in one direction and minimal color variety, while permeable pavers integrate drainage without visible slope in compact yards.
- Regular maintenance including sealing every 2–3 years, polymeric sand replacement for weed prevention, and minor paver replacement keeps your patio looking new without hiring professional crews.
Why Square Pavers Are Ideal for Patio Projects
Square pavers simplify layout and math. A 12-inch square tile covers 1 square foot: a 6-inch square covers 0.25 square feet. These nominal sizes (actual dimensions are slightly smaller due to production tolerances) let you calculate material counts without guesswork. Uniform edges also mean minimal cutting and waste, and joints stay tight and even.
Different materials offer different advantages. Concrete pavers are affordable and come in dozens of colors: porcelain resists stains and requires less maintenance: natural stone (limestone, bluestone) adds upscale appeal but demands regular sealing. Permeable pavers with open joints let water drain straight through, helping with local stormwater code compliance. Standard thickness is 2 to 2.5 inches, which distributes foot traffic loads evenly over a properly prepared base.
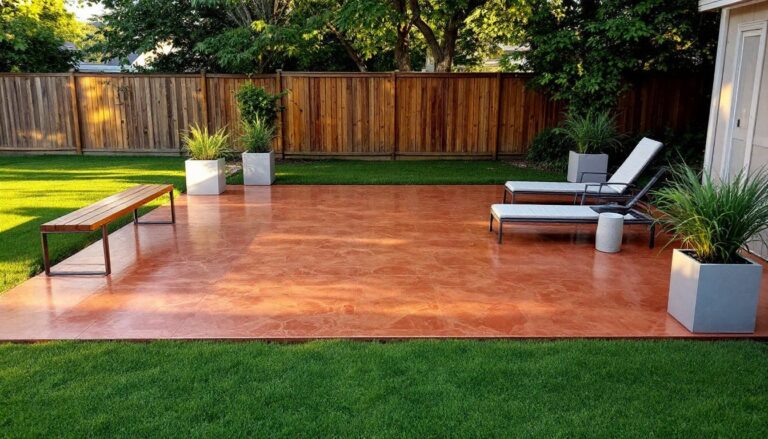
Classic Grid Layout: Timeless and Easy to Install
A simple grid, pavers laid in neat rows and columns, is the easiest pattern for a first-timer. All cuts are straight, and you can snap chalk lines to keep rows aligned. Start at a corner closest to your house and work outward: this minimizes visible cuts along the border.
Grid layouts feel modern when you use a single color and let the uniform joints create visual order. For added interest, choose pavers with a subtle texture or slight color variation within the same range. A 1-inch joint (sand-filled or polymeric) is typical and stable. You’ll need a level, rubber mallet, and a straightedge to ensure each paver sits flush. Prep is crucial: a compacted 4-inch base of crushed stone or gravel prevents settling. Rake the base level, dampen it lightly, and compact with a plate compactor, this single step prevents most long-term problems.
Herringbone and Diagonal Patterns for Visual Interest
A herringbone pattern uses rectangular pavers (or squares laid at angles) in a V-shaped weave. It demands more cuts but creates dynamic movement and hides imperfections better than a grid. Lay the first row down the center at 45 degrees, then alternate direction with each row. A miter saw or wet saw makes clean crosscuts: a circular saw works but leaves rougher edges.
Diagonal grid layouts place square pavers at 45 degrees to your foundation. This stretches a modest patio visually and works beautifully with darker borders. The downside: you’ll cut a lot of triangular edge pieces. Pre-cut your perimeter pavers before laying: dry-lay them first to map out the cuts and minimize waste. Diagonals also demand accurate base preparation because the angled loads shift stress differently than a square grid. A solid, level foundation is non-negotiable here. Designs showcased in professional patio galleries often pair diagonal or herringbone patterns with contrasting border colors to emphasize the layout.
Mixed Material Combinations and Color Blocking
Blending two paver materials or colors creates a custom look without breaking the budget. A common approach is a 12-inch concrete square in one color with a 6-inch accent in another, laid in a checkerboard. The smaller pavers fill the gaps, and the contrast draws the eye.
Color blocking, large zones of different hues, defines spaces without hardscape borders. Imagine a light stone center fading to charcoal at the edges, or a rust-colored border framing a cream interior. This technique works because your eye accepts the pattern logic quickly. Mix materials strategically: pair porous concrete with stain-resistant porcelain near the grill, and permeable pavers under the seating area. Material mixes do require careful base work, all pavers must sit at the same height, so check nominal and actual dimensions before installing. Regional inspiration from home design publications often showcases color and material combinations that work with local landscapes.
Space-Saving Designs for Small Patios
Small patios need smart layouts. A tight 8-by-10-foot space benefits from long sight lines: use rectangular pavers oriented the same direction to visually stretch the area. Avoid busy patterns, a clean grid with one accent row reads larger than a busy herringbone.
Raised planter beds along one edge define the patio boundary and add greenery without eating floor space. Permeable pavers let you integrate drainage without visible slope, crucial in compact yards. Keep the pallet simple: one or two paver colors, consistent joint width, and minimal seating furniture leave the space feeling open. For postage-stamp yards, consider a small square patio (10-by-10 feet) flanked by planting beds or adjacent to a deck: this creates visual separation without overwhelming the lot. Measure twice, and account for overhangs from shrubs or structures that might create permanent shade on the patio later.
DIY Installation Tips and Best Practices
Permit check first. Some jurisdictions require permits for patios larger than 200 square feet or structures with permanent electrical work. Verify with your local building department, it takes a phone call and prevents costly headaches.
Base prep is your foundation (literally). Excavate 5 to 6 inches deep, accounting for 4 inches of compacted base and 1 to 2 inches of paver height. Add landscape fabric to suppress weeds, then lay crushed stone in 2-inch lifts, compacting each layer with a plate compactor. Rent one for the day, this machinery is cheap and transforms the job. Dampen the final base layer and let it set for 24 hours.
Material checklist:
• Square pavers (calculate by area: add 10% for cuts and breakage)
• Polymeric joint sand (binds when wet, hardens, and resists weeds)
• Landscape fabric
• Crushed stone base (75-ton limestone or recycled asphalt)
• Concrete leveling sand (as a base layer for final height adjustment)
Tool essentials:
• Plate compactor (rent, don’t buy)
• Rubber mallet
• Wet saw or miter saw (for cuts)
• Straightedge and level
• Shovel and wheelbarrow
• Chalk line
• Tape measure
• Safety gear: work gloves, safety glasses, dust mask (especially with concrete or stone dust)
Laying pavers: Start at the corner nearest your house or a fixed line (fence, deck). Use the mallet to tap pavers level: check every few rows with a long straightedge. Joints should be consistent, use plastic spacers if needed. Sweep polymeric sand into joints, mist lightly with a hose, and let it cure per manufacturer instructions (usually 24–48 hours) before walking on it. Comprehensive guides to outdoor surfaces and patio installation cover troubleshooting and material selection in depth.
Maintenance and Long-Term Care for Square Paver Patios
Seal concrete and natural stone pavers every 2 to 3 years to resist stains and UV fading. Penetrating sealers soak into the material: film-forming sealers create a protective coat on top. Test in a small area first, some sealers alter color or appearance. Follow product instructions and apply in dry, mild weather (50–85°F).
Weed growth in joints is inevitable but manageable. Annual polymeric sand replacement stops weeds before they start. If weeds appear, pull them by hand or use a narrow weeding tool: avoid aggressive chemicals near soil or planted beds. Pressure washers work but can displace sand and damage softer materials like limestone, test on scrap pavers first.
Salt damage occurs in cold climates where deicing salts are used. Calcium chloride is less harsh than rock salt: avoid rock salt on natural stone. Brush off salt residue in spring. Spilled oil or rust stains respond to specialized cleaners: apply according to product directions, and always test on a small, inconspicuous area.
Minor paver replacement is straightforward. Chisel out the damaged unit, clear the sand underneath, and tap in a new paver at the same height as its neighbors. No mortar or professional tools required. This repairability is one reason why square pavers outlast monolithic concrete or asphalt.