Table of Contents
ToggleA walk-in shower with beautiful tilework can turn your morning routine into something you actually look forward to. Whether you’re drawn to the clean lines of subway tiles, the organic appeal of natural stone, or the bold personality of encaustic patterns, the right tile design elevates both function and aesthetics. Modern walk-in showers prioritize accessibility and flow, and tile choices directly impact how the space feels, from cozy and intimate to spa-like and expansive. This guide walks you through popular tile materials, smart layout strategies, color combinations that work, and practical installation tips to help you nail your project.
Key Takeaways
- Ceramic and porcelain tiles are the most durable and practical options for walk-in showers, with porcelain offering superior water resistance despite a higher cost.
- Running-bond (brick) patterns with subway tiles or large-format layouts (12×24 inches or larger) create clean, spacious aesthetics while minimizing grout lines and installation complexity.
- Neutral color palettes with strategic accent tiles at eye level (around 60 inches) hide soap scum while maintaining visual interest without overwhelming smaller shower spaces.
- Proper substrate preparation using cement board, dry-laying tiles before installation, and using thin-set mortar ensures long-term durability and prevents costly rework.
- Epoxy grout, water-based sealing within 72 hours, and consistent maintenance—including daily squeegeeing and weekly vinegar rinses—keep your tile walk-in shower pristine and mold-free for decades.
- Large-format tiles and textured finishes reduce slipperiness and visual busyness, but require flawless wall prep and balanced combination with smooth tiles to maintain cleanliness.
Popular Tile Materials and Styles for Walk-In Showers
Ceramic tile remains the most popular choice for walk-in showers because it’s durable, water-resistant, affordable, and comes in endless designs. Glazed ceramic handles moisture well and cleans easily, a 6-by-12-inch subway format is the classic, though larger formats like 12-by-24-inch tiles reduce grout lines and visual busyness.
Porcelain tile is denser and less porous than ceramic, making it ideal for areas with heavy water exposure. It’s pricier but lasts longer and resists staining better. Large-format porcelain tiles (18-by-36 inches or bigger) create a seamless, contemporary look, though they require careful layout to avoid lippage (slight unevenness at tile edges).
Natural stone, slate, limestone, or travertine, delivers luxe visuals but demands ongoing sealing and care. Slate can be slippery when wet, so pair it with a matte sealer or use it strategically on dry zones. Travertine’s porous nature means water can penetrate if not sealed properly: it’s better suited for experienced DIYers or professional installation.
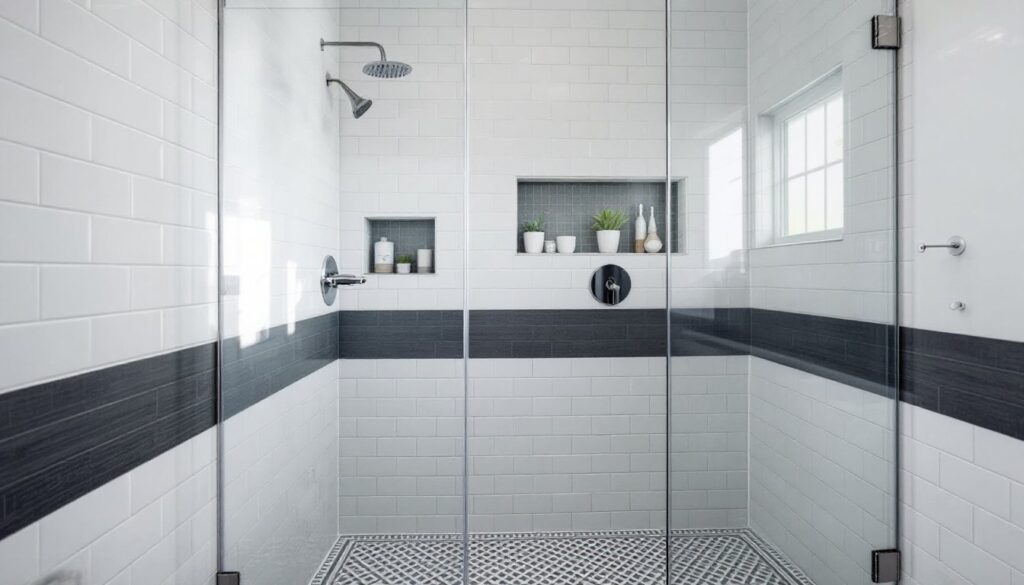
Glass tile adds light and depth, working brilliantly as an accent or full surround. It shows water spots and soap residue more than ceramic, so cleaning discipline is needed. Mix glass with ceramic for visual interest without the maintenance burden. Popular styles include field tiles laid in running-bond (brick) patterns, mosaic accents, and large-format slabs. Subway tiles dominate modern bathrooms because they’re forgiving to install and photograph well, but penny rounds, hexagons, and linear mosaics all perform well in wet environments.
Layout and Design Patterns That Maximize Space
Smart tile layout makes a small shower feel larger and a large one more intentional. Start by mapping out your walls, niche, and fixtures to plan full-tile versus cut-tile areas, minimizing cuts saves time and waste.
Subway Tiles and Linear Patterns
Subway tiles laid in a classic running-bond (brick) pattern are forgiving and visually quiet, letting wall color, lighting, and fixtures shine. The horizontal grout lines guide the eye along the wall, subtly widening a narrow shower. Stagger each row by half a tile width for the classic look: the pattern is also easier to cut and fit around curves.
For a modern twist, try a vertical stack bond (tiles aligned in columns) to draw the eye upward, making ceilings feel higher. This layout requires more precision but creates a striking linear effect. Another option is herringbone or chevron patterns, these add geometric interest but are more complex to measure, cut, and install. Reserve herringbone for accent walls or niche surrounds: full-wall herringbone can overwhelm a small shower.
Large-format tiles (12-by-24 inches or 18-by-36 inches) create a minimalist aesthetic with fewer grout lines, and they’re faster to install. The trade-off is that they show imperfections in the wall more, so substrate prep must be flawless. Running-bond layouts work well at this scale too: the wider tiles maintain visual calm even in larger showers. The Bob Vila team’s renovation guides offer detailed layout examples for different tile sizes. When designing, place accent tiles or mosaic borders at eye level (roughly 60 inches from the floor) to anchor the design without overwhelming the sightline.
Color and Texture Combinations for Visual Interest
Neutral tiles, whites, grays, soft beiges, make showers feel spa-like and timeless. They also hide soap scum and mineral deposits better than dark colors, reducing the appearance of grime between cleanings. Pair a neutral field tile with a darker or patterned accent band at shoulder height to break up the monotony without sacrificing cleanliness.
For warmth, consider warm grays, soft taupes, or muted earth tones. These palettes complement wood accents (like teak or bamboo shelving) and work beautifully in minimalist or mid-century modern bathrooms. A vintage blue tile bathroom design pairs moody blues with white or cream trim, evoking timeless charm without feeling dated.
Textured tiles, matte finishes, 3D patterns, or handmade looks, add tactile interest and reduce slipperiness compared to high-gloss glazes. Textured tiles hide dust and water spots but are harder to clean grout from. Combine textured tiles on lower walls (where they take impact) with smooth, glossy tiles above for a balanced approach.
Color blocking, using two or three colors in distinct zones, makes small showers feel larger if the blocks are horizontal or diagonal. A darker color on the lower third grounds the space: lighter tones above lift the eye. Avoid color changes that cut the wall at eye level, as this can feel chopped up. Encaustic tiles (hand-painted, Moroccan-style patterns) work as accents or full walls in larger showers, but they’re expensive and delicate: reserve them for focal walls behind a visible niche. Remodelista regularly features kitchen and bathroom remodel inspiration with curated color pairings if you’re seeking fresh combinations.
Practical Installation Tips for Beginners
Prep work separates successful installs from disasters. Your substrate must be stable, flat, and waterproof. For wall tile, cement board (like Durock) is the standard: it resists moisture better than drywall. Acclimate tiles to the bathroom for 24–48 hours before installation, temperature and humidity changes cause movement, so unopened boxes sitting in the room prevents mid-install surprises.
Measure and dry-lay a few rows (without adhesive) to confirm spacing, cut locations, and visual balance. A tile spacer set ensures consistent grout lines: 1/8-inch spacers are standard for most residential tile, though large-format tiles often use thinner spacers.
Use a notched trowel sized for your tile: 3/16-inch by 5/32-inch for tiles under 8 inches, 1/4-inch by 3/8-inch for medium tile, and 1/2-inch by 1/2-inch for large-format tiles. Spread thin-set mortar (not mastic, it can fail in wet areas) on the wall in small sections, combing at a 45-degree angle. Press each tile firmly, twisting slightly, and check level every 3–4 tiles. Houzz’s ceramic tile walk-in shower photo gallery shows professional layouts you can reference.
Wear safety glasses, work gloves, and a dust mask when cutting tiles with a wet saw. Let mortar cure fully (usually 24 hours) before grouting. For wet areas, use epoxy grout over standard grout, it’s more water-resistant and stain-proof, though harder to work with. Apply grout with a grout float held at 45 degrees, then sponge-clean excess before it hardens. Seal grout in showers within 72 hours with a water-based sealer to prevent mold and discoloration. Tile installation is doable for confident DIYers, but if your walls aren’t plumb or your shower layout is complex, hiring a pro saves headaches and rework costs.
Maintaining Your Tiled Walk-In Shower
Daily maintenance is minimal, squeegee water from tiles after each shower and wipe the floor dry to prevent slip hazards and soap scum buildup. Weekly, spray walls with a 50/50 white vinegar and water solution, let sit 10 minutes, and rinse. This keeps mineral deposits at bay without harsh chemicals.
Monthly, scrub grout lines with a soft brush and grout cleaner or baking soda paste. Avoid acidic cleaners on natural stone tile: use pH-neutral soap instead. For sealed surfaces, reapply a water-based sealer every 2–3 years (or per product instructions) to maintain water resistance.
Mold and mildew hide in grout and caulk. Keep the shower well-ventilated, run an exhaust fan during and 30 minutes after showers, and ensure the caulk at corners and trim stays intact. Silicone caulk lasts longer than acrylic in showers: replace it every 5–7 years or when it cracks. A small investment in proper grout sealer and ventilation prevents costly mold remediation. Eventually, a well-tiled walk-in shower is a low-maintenance luxury when you address it consistently.
Conclusion
Your tile walk-in shower is a long-term investment in both function and daily comfort. Choosing the right material, layout, and color palette transforms the space into a retreat while ensuring durability and easy upkeep. Start with solid prep work, measure twice, and don’t rush installation or sealing, these details determine whether your shower looks and performs beautifully for decades. With honest assessment of your skill level and patience with the process, you’ll end up with a tiled sanctuary you built yourself.